You must have a personal Digital Banking login and at least one open checking account to enroll in Personal Bill Pay. Please note that after you have enrolled your account, if you require any account maintenance, like adding or removing of accounts, please contact the Concierge Desk at 888-322-2120 and they will perform the updates for you.
Enrolling in Bill Pay is a quick and easy process. Follow the below steps to begin your bill pay journey.
Step 1: Log in to Digital Banking
Step 2: Select “Bill Pay” on the main menu.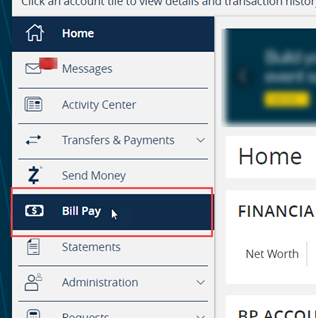
Step 3: Select the primary bill pay account and click “enroll”. Accept the Terms and Conditions that are presented.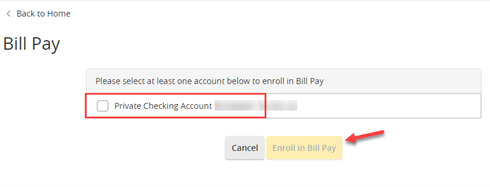
Step 4: Upon successful enrollment, click “Continue to Bill Pay”. Your Bill Pay journey has begun. Access Bill Pay screens by selecting “Get Started” or clicking on the X in the upper right of the Welcome pop-up.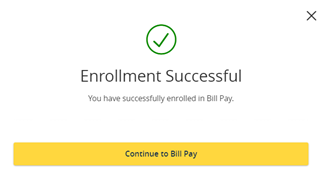
Nicknaming your Accounts
It may be helpful to nickname your accounts if you are utilizing multiple accounts to pay from. Follow the steps below for adding nicknames.
Step 1: From the Payment Center select the “Accounts” tab at the top.
Step 2: Click on “Change Name” in the lower right corner.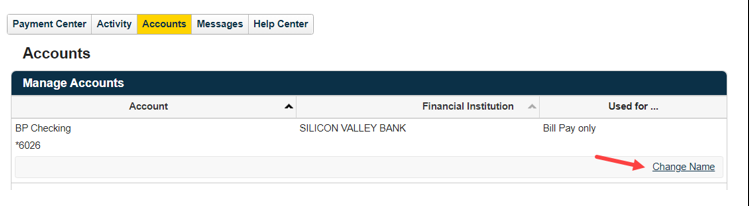
Step 3: Enter the new account nickname and then click “Save”.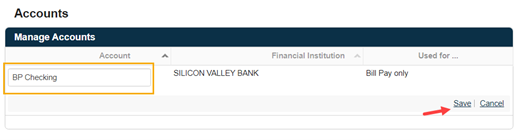
Setting up a New Biller
Let’s get some billers added so you can start making payments.
Step 1: Click on the Payment Center tab at the top.
Step 2: Select “Add a Company or Person”. There are two options when adding billers. They can be added manually or by clicking on “Find My Bills” and utilizing an automated tool called Bill Discovery. Bill Discovery is covered in more detail further down in this article.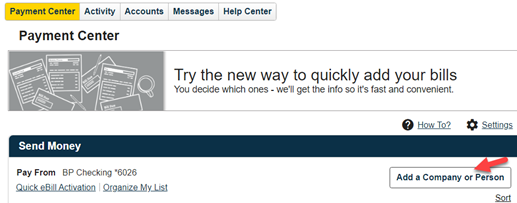
Adding a Company: Enter the company name on the search bar or search by clicking on one of listed categories. Companies that show in the categories under the Bill Pay network will likely support electronic payment capability after the first successful payment has been processed. For these billers, the system stores some information such as address and phone number so you will not need to complete that information during the set up.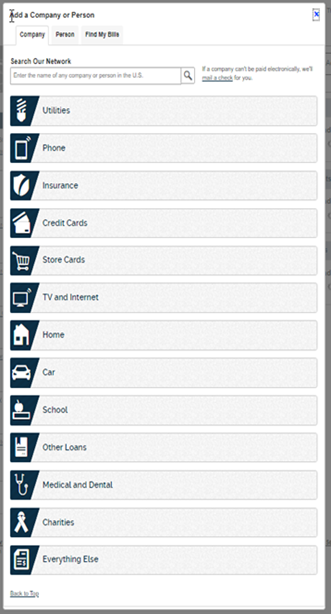
Adding a Person: Click on the Person tab at the top of the form and input the billers’s information.
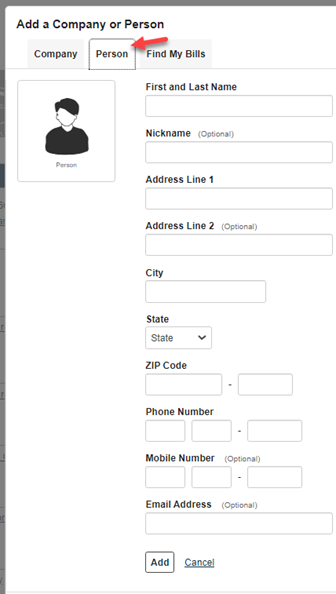
Step 3: After completing the required fields, click “Add” at the bottom. Security alerts are sent out via email notification whenever a biller is added or modified.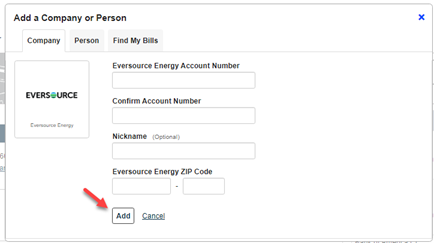
Find My Bills
Bill Discovery is a great feature that assists with matching your profile information or credit report with billers in the network. Follow the below steps to use Bill Discovery.
Step 1: Access Bill Discovery either by clicking on “Add My Bills Now” from the Payment Center screen or by selecting “Find My Bills” in the Add a Company or Person screen.
From the Payment Center:
In the Add a Company or Person screen: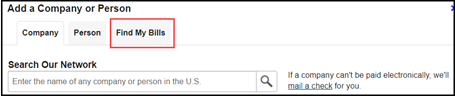
Step 2: Select option(s) to find your bills from. You can select one or both: Bills from our biller network and/or Your credit report.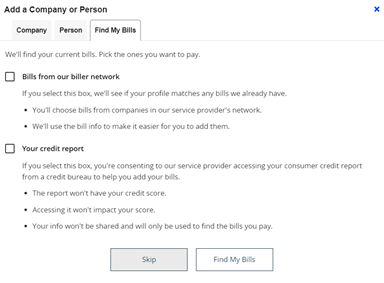
Step 3: Provide consent and the system will pull back a list of bills. Select the bills from the list that you would like to add to your Digital Banking Bill Pay service. Click “Add” to complete the process. Note: some billers may require additional authentication.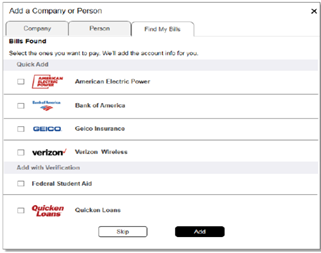
For more information about the Bill Discovery, please visit Bill Discovery makes payments simple, smart and fast
How to Edit or Delete a Biller
It’s easy to review, edit or delete a biller on the system. Follow the below steps for this process:
Step 1: Start by clicking on the biller’s name in the Payment Center.
Step 2: To edit a biller, simply update the information needed. Note: for billers in the Bill Pay Network the system will only allow changing the account entered or the nickname. Under the company name it will display: The company contacts us directly if the address changes.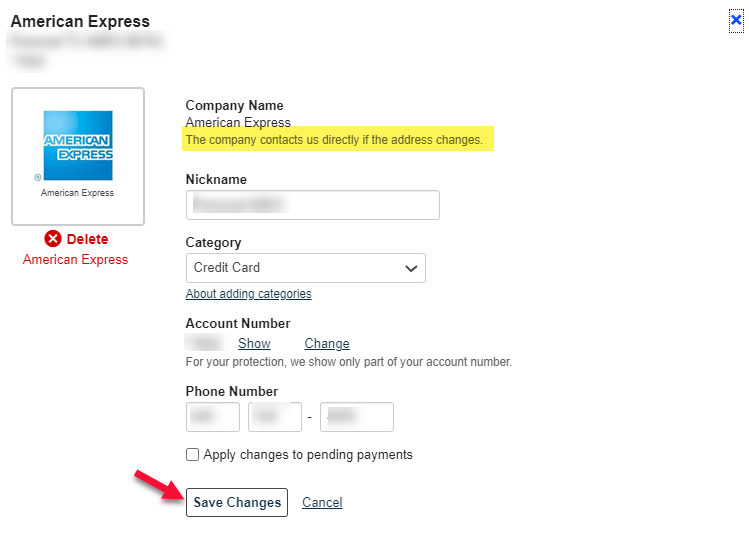
Step 3: To delete a biller, click on the biller’s name and then click “Delete” in the upper left corner under the biller icon. Note: biller payment history is still available after the biller has been removed.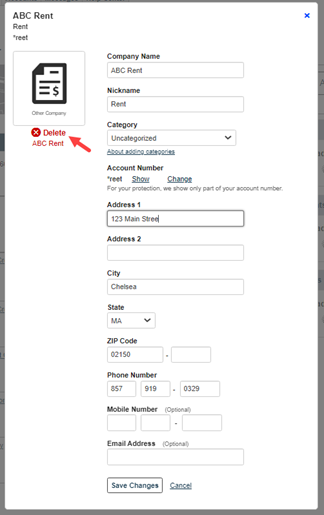
Step 4: A confirmation box will appear. Click “Delete” to complete the process.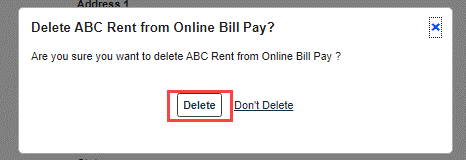
How to Send a Payment
After billers have been added, you’re ready to send your first payment.
Step 1: On the Payment Center, locate the biller you want to pay. On the right side, click in the amount box and enter in the amount of the payment.
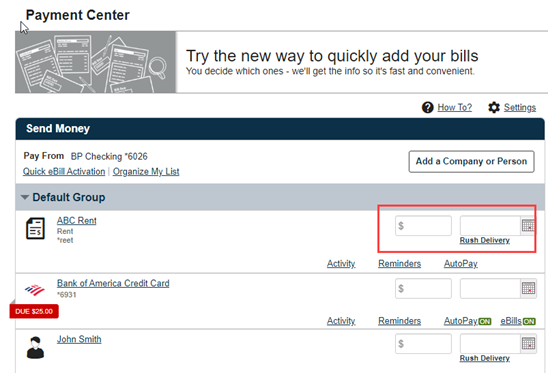
Step 2: Select the calendar and choose the date you want the payment to be delivered on. Depending on the biller, there may be options to select Rush delivery. The fee for the Rush delivery will appear when the option is selected. If the biller is paid via check, it will be mailed 3-5 business days prior to the scheduled payment date to ensure it arrives in time.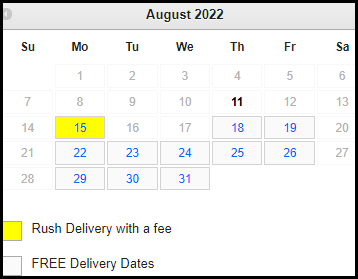
Step 3: Scroll down and click on “Send Money”
Step 4: Details of the payment will display. After reviewing the payment for accuracy, click on “Submit Payments”. Note: There is an optional field to enter memo information, for example an invoice number, for checks. (this is not available for electronic payments). This information will be printed on the check.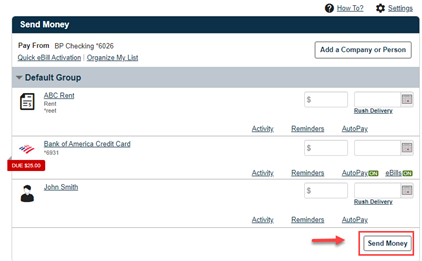
Step 5: Details of the payment will display. After reviewing the payment for accuracy, click on “Submit Payments”. Note: There is an optional field to enter memo information, for example an invoice number, for checks. (this is not available for electronic payments). This information will be printed on the check.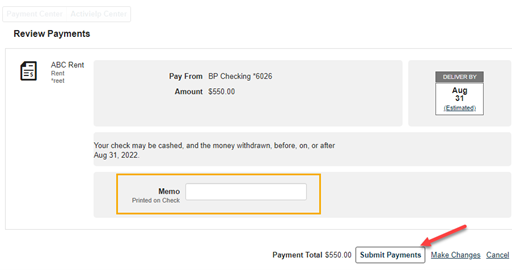
A payment confirmation screen will appear. To learn more about how bill payments are processed please go to: How online bill payments are processed.
How to Edit or Cancel a Payment
Payments can only be cancelled or changed if they have not been sent/mailed yet. They must still be in a pending status on the system. Once the status changes to processed, it can’t be changed or cancelled. Follow the steps below to change or cancel a payment:
Step 1: On the Payment Center, go to the Pending Payments section on the right side. Navigate to the payment and select either “Change” or “Cancel”.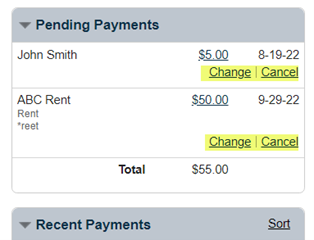
Step 2: If you are changing the payment, edit the information on the Change Payment screen, then click “Save Changes” at the bottom. Note: the payment can also be cancelled from this screen if needed.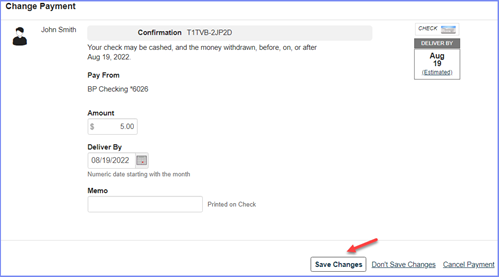
Step 3: If you are cancelling a payment, select “Cancel Payment” at the bottom of the Cancel Payment screen.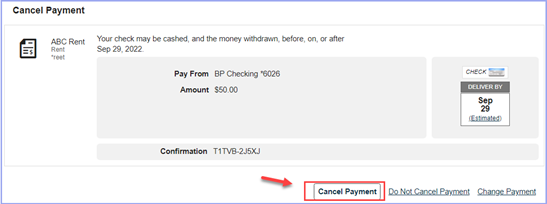
The Payment cancellation confirmation screen will display.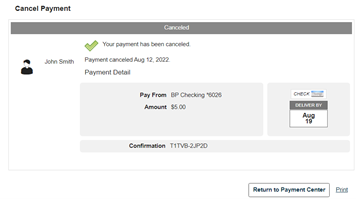
If the payment has already been sent/processed and there is no cancel option, please contact the Concierge Desk at 888-322-2120 to request a stop payment.
Setting up an AutoPay
You can set up an automatic payment that will be sent on a recurring schedule for a certain length of time. Please note that payments that fall on a weekend or holiday will default to paying on the previous business day. See steps below for setting up AutoPay.
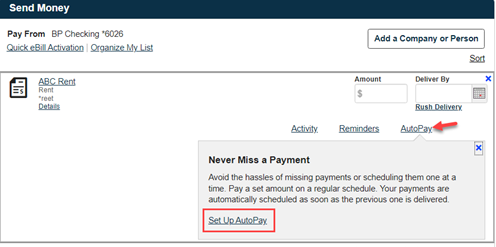
Step 1: Navigate to the Payment Center and locate the biller you want to set up for AutoPay. Click on “AutoPay” on the right side of the biller screen. Then select “Set Up AutoPay”
Step 2: Complete the following details:
- Choose the account to pay from
- Enter the amount
- Fill in the Memo field if there is information you want to include on a check payment
- Select the First Delivery Date
- Choose the Frequency of the payment
- Select a Duration time period that you want the payment to keep processing
- Set up Email notifications by entering in your email address and selecting which notification types you wish to receive
Note: if eBills are enabled for the biller there may be additional amount and date options depending on the biller.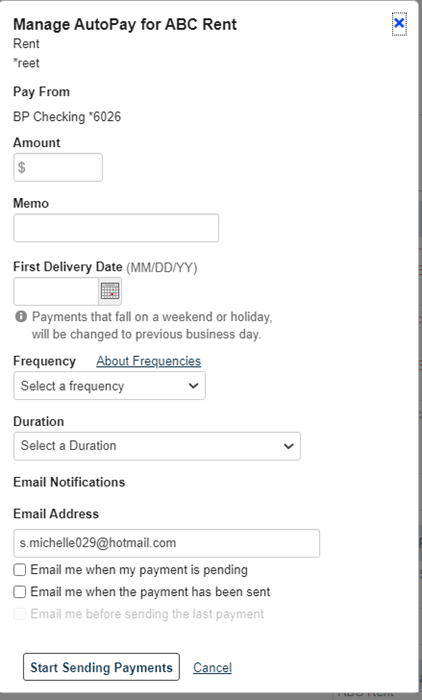
Step 3: Click “Start Sending Payments”. A confirmation box will appear. Click on “Start Sending Payments” to kick off the AutoPay.
Changing an AutoPay
An Autopay can be updated by following the below steps:
Step 1: On the Payment Center, locate the biller you want to update. Select “Change AutoPay Options” in the Manage Your AutoPay box.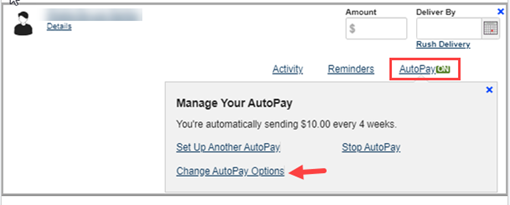
Step 2: The Manage AutoPay screen will open. Make the required updates and click “Save Changes” at the bottom.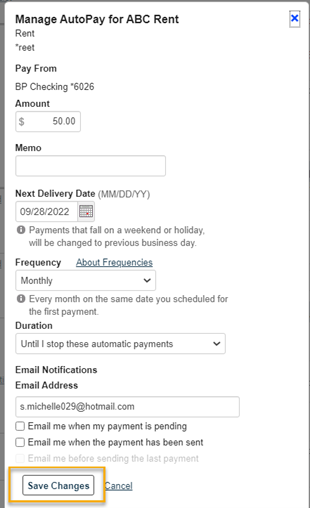
Step 3: A confirmation of the saved changes will appear. It is a good practice when updating an AutoPay to navigate to the Pending Payments on the Payment Center screen to confirm that the original payment frequency/date/amount is cancelled and the updated AutoPay selections are appearing and scheduled.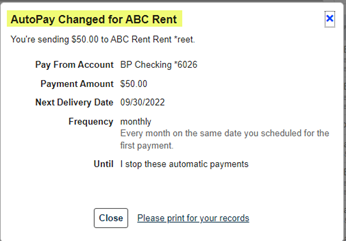
Cancelling an AutoPay
Cancel an AutoPay by following the below steps:
Step 1: On the Payment Center, locate the biller you want to stop for AutoPay. It should say “ON” next to AutoPay. In the Manage Your AutoPay box, select “Stop AutoPay”.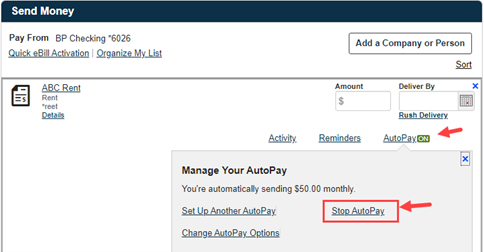
Step 2: The Stop AutoPay screen will open. Click on “Stop AutoPay”.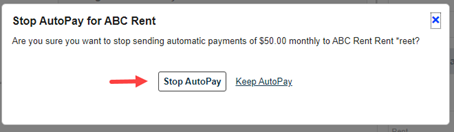
Step 3: A confirmation box will appear. Click on “Stop AutoPay” to complete the action. It is a good practice when deleting an AutoPay to navigate to the Pending Payments on the Payment Center screen to confirm that the payment is cancelled.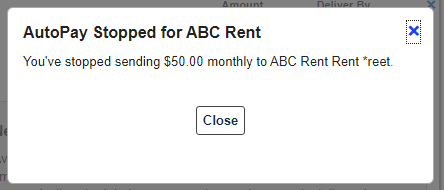
How to Turn on eBills
eBills is a feature that enables the capability for users to receive their bills electronically to their email through the Bill Pay system. Not all billers offer eBill functionality. It is important to note that users can’t have eBills enabled for the same company for more than one bill paying service. Turning it on at a second Financial Institution will disable it at the first one.
Below describes how to set up eBills.
Step 1: If the biller offers eBills, there will be a blue label on the left of the biller’s name that says “Get eBills”. Click on this label or select “eBills” to the far right of the screen.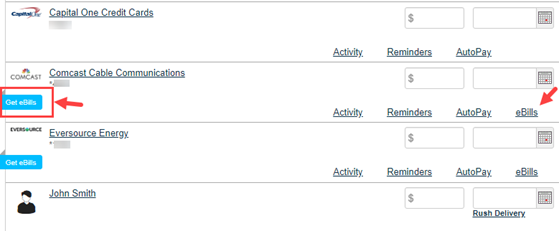
Step 2: The eBills information and Add screen will display. All available billers for eBills will appear and you can turn on eBills for each biller on that screen. Note: some billers may require additional information for example SSN, address or zip code.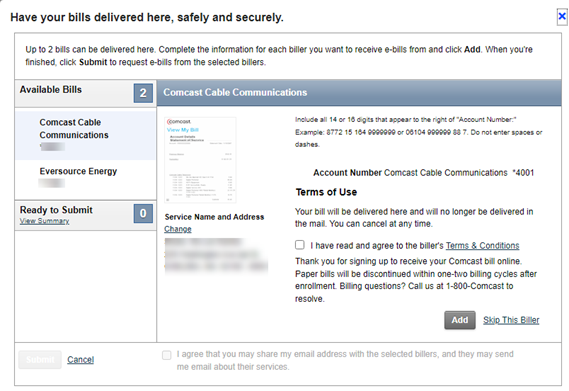
Step 3: Review and Accept the Terms of Use. If any other eBills are available, the screen will show the next biller. You have the option to either Skip this Biller or enroll for the additional biller in the eBills service. When you are ready to enroll, click “Submit”. A confirmation window will appear
After eBills has been enabled, here’s what happens:
- It can take one or two billing cycles to receive your first bill via eBills
- When your bill arrives, you’ll see the due date next to the biller name in the Payment Center.
- You’ll receive an email notification of your bill statement at the email address we have on file.
How to Manage eBills Reminders
eBills generate reminders when the due date is approaching and there has not been a payment scheduled. Follow the steps below to remove the eBill from the reminders.
Step 1: In the Bills Due section, select one of the following “File” or “Pay” the bill. Selecting “File” means that you have already paid the bill and you will need to indicate how it was paid. Selecting “Pay” means you will pay the bill at this time.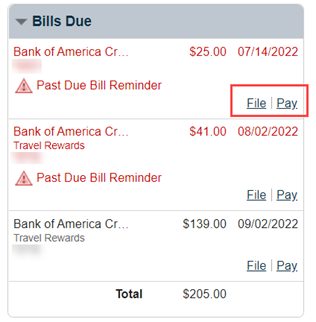
Step 2: To Pay the bill, click “Pay” in the Bills Due section. Then select or enter the amount and date for the payment. Click on “Review Payment”. On the confirmation screen, review the payment details and click on “Submit Payment” to complete the payment process.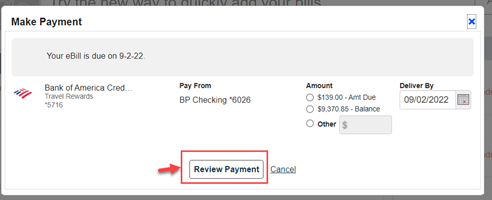
Step 3: To File the bill, click on “File” in the Bills Due section. Select the appropriate method by which the bill was paid. Click on “File Bill” to complete the filing process.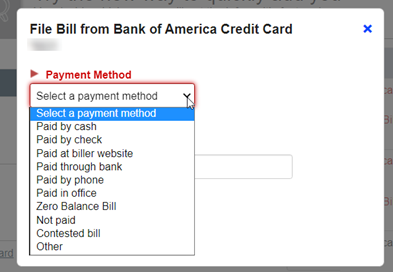
How to Turn off eBills
eBills can easily be disabled by navigating to the Bill Pay Payment Center and following the below steps.
Step 1: Locate the appropriate biller. If eBills are turned on for the biller, the eBills option in the upper right corner will show a green “ON” status. Click on “eBills ON”. At the bottom of the box, click “cancel eBills”.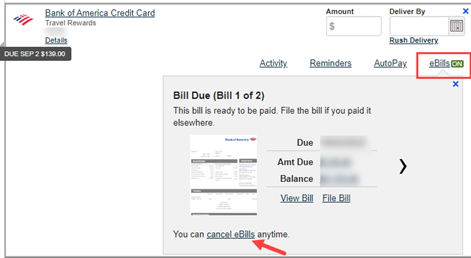
Step 2: Confirm that you would like to stop the eBills service by clicking on “Stop eBills”.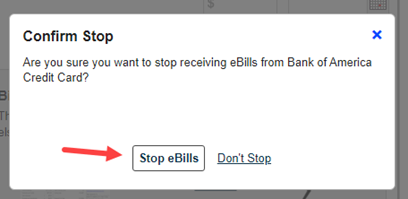
Bill Pay retains a rolling two years of transaction history. The processed bill pay transactions will also appear on the account transaction history screen within Digital Banking. To search bill payment history, follow the steps below.
Step 1: Navigate to the Payment Center and select the “Activity” tab at the top. Select the date range to search.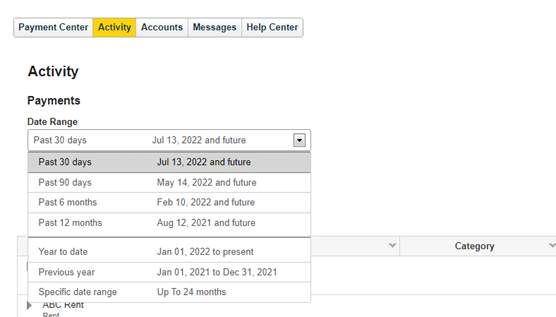
Step 2: After entering the date, the following filter options are available: Recipient Name, Category, Status and Account.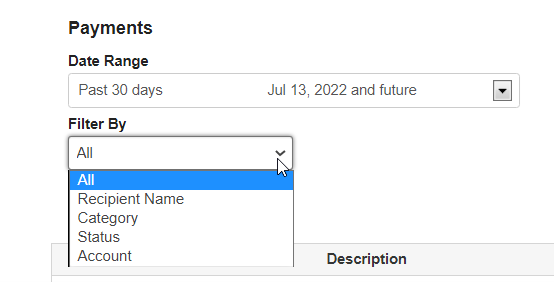
Step 3: If using the filter option, after selecting the criteria you must choose the appropriate option that populates in the sub-menu. For example if you choose to filter by Recipient Name, the sub-menu will list all of your billers to choose from.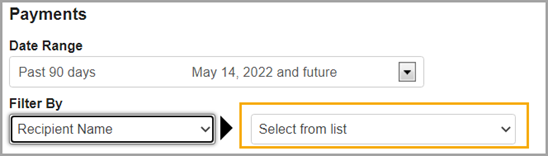
Step 4: As you are filtering, the system will display the history matching the criteria on the screen. You have the option to Download or Print the results. The downloaded file is in csv format.