Account list
The Account List is available for all Corporate Edition users. It is a great feature that offers users with a large number of accounts the option to dynamically manage their preferred view, has advanced sorting, and allows for much easier management for grouping of their digital banking accounts. In the Account List, indicate Priority Accounts that will appear on the home screen by clicking on the star icon. A full list of accounts will display on the Account List screen.
Getting started
The Account List contains advanced sorting and filtering options as well as the ability to select multiple accounts when creating or editing groups. Each group displays the accounts, current and available balances, and balance total for the group.
Selecting your Priority Accounts to be displayed on your account home page allows you to view your favorites instead of having to navigate through a much larger list. Priority Accounts will be retrieved and updated immediately at login, while all other accounts will update in the background, which allows for a faster login experience. Below are the steps for enabling the Account List and selecting the Priority Accounts.
You may turn on/off the Account List feature at any time within Settings > Home Page Preferences.
New users will have this feature enabled automatically.
For additional information, expand on the sections below:
Corporate Digital Banking users may enable/disable the Account List option via the Home Page Preferences screen.
Step 1: Navigate to Settings menu tab.
Step 2: Select, Home Page Preferences.
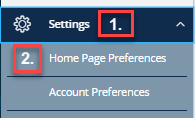
Step 3: Select Account List to enable it.

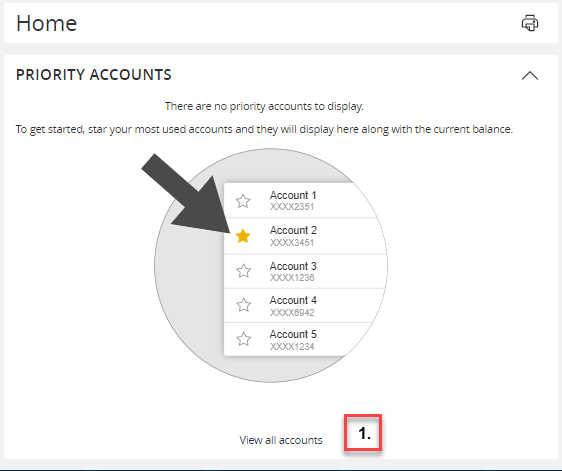
Priority Accounts are accounts selected by the user for a quick preview on the home page. Each user may manage their Priority Accounts at any time via the Account List screen.
Choose your Priority Accounts
Step 1: From the Home screen select View All Accounts
Step 2: The Account List screen displays all available accounts.
- Star the accounts you wish to designate as Priority to display on the Home screen.
- You may selected up to 25 Priority Accounts.
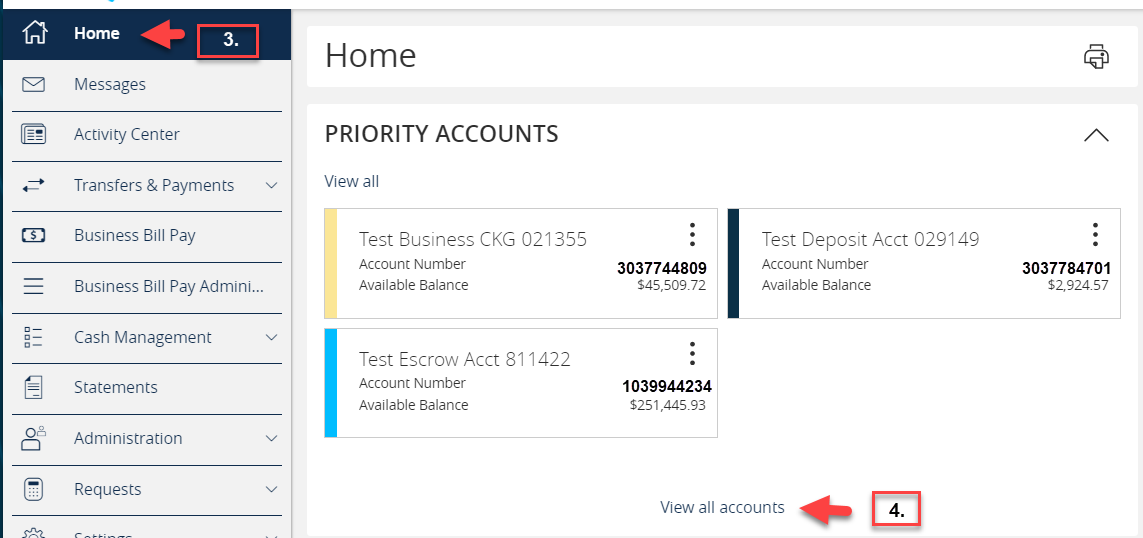
Step 3: Home Screen
- Once the Priority Accounts are selected, navigate to the Home screen. Only the Priority Accounts will be listed.
- Each Account displays Account Name/Nickname, Account Number, and Available Balance.
Step 4: To view all accounts, update Priority account selection, or create account groups, choose View all/View all accounts on the Home screen and you will return to the Account List.
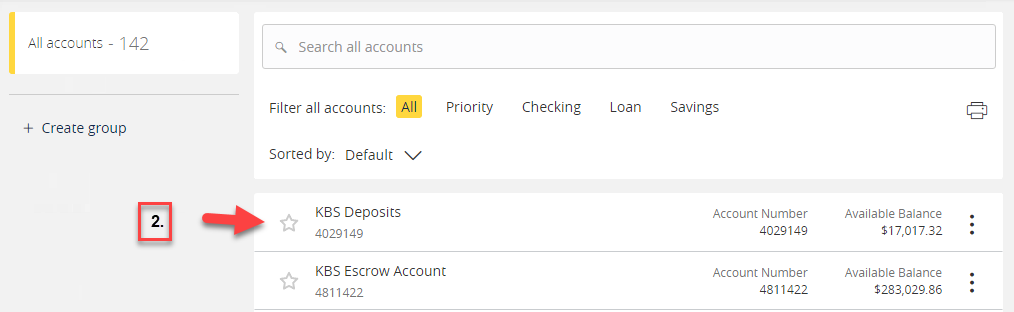
The Account List screen has a search and several filter and sorting options to assist in retrieving accounts quickly and by specific type.
Search
Search by Account Name/Nickname, and partial Account Number.
Filter
Filter the Account List by selecting one or multiple of the account types listed below.

All – accounts enabled for the user to access.
Priority – accounts starred to display on the home page.
Checking – Deposit Account Type (Checking, Now and MMDA)
Loan – Loan Account Type (Term and Line of Credit)
Savings – Savings Account Type
Ungrouped – Account not assigned to a designated Group.
Sort
Accounts can be sorted by selecting the down arrow next to Default. There are multiple sorting options available.
- Sort Balance: Available/Current Balance - lowest to highest or highest to lowest
- Sort Name: Account Name - A - Z or Z - A
- Sort By Other: Account Number Ascending, Descending, or Default (by group order)

Groups
Account groups are created and viewed on the Account List screen. The groups display top-level, next to the accounts list, and act as quick filter options. This view allows for quick and easy drag and drop capability when moving accounts between groups or reordering group tiles. Multiple accounts can be selected when adding, creating, or editing groups. An account may only be assigned to one group.
How to Create Group
Step 1: Select Create Group from the Account List screen.
Step 2: Enter the Group Name
Step 3: All ungrouped accounts will appear in the list. Filter the Account list to assist in displaying preferred accounts to assign to the group.
Step 4: Select the Accounts to be included in the new Group. There is an option to Select All or to choose specific accounts.
Step 5: To save the group: scroll to the bottom right side of the page and click on Create Group. The total selected accounts noted at the end of the list.
Step 6: A confirmation appears with the new group name and the number of accounts in the group. The new group will display on a tile on the left side. Depending on account types in the group, the following will be displayed on the group tile:
- Group Name
- Total accounts assigned to group
- Cumulative Available balance total of grouped accounts
- Cumulative Current balance total of grouped accounts
Step 7: There is a search, sort, and filter capability within each group account list. Accounts in the group can be starred to display on the Priority Account Home screen.
Accounts can easily be moved to and from groups. They can be relocated to a specific group or can be ungrouped. This is accomplished by dragging and dropping from the Account List, or by using the toggle menu. All changes are updated in real-time.
Dragging and Dropping
Step 1: To view all accounts, select All Accounts at the top of the Group Tiles.
Step 2: Drag any account and drop it into a group. If it is already in another group, it will be moved to the new one you dropped it in.
Toggle Menu
Step 1: Open the toggle menu to the right of the account.
Step 2: Select Move to group.
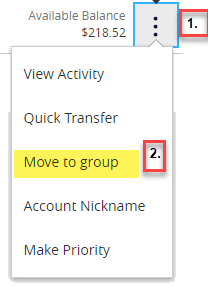
Step 3: Click the down arrow and choose the preferred group.
Step 4: Select Move to assign and save the account to the selected group.
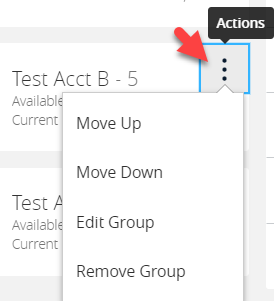
Updating Groups
Groups can easily be updated by selecting the toggle to the right of the Group Name. There are options to move, edit, or remove the group.
Edit Group
Use this option to update the Group Name or to remove accounts from the group.
Move Up/Down
Use this option to move the group(s) up/down the group list as needed.
Remove Group
Use this option to remove the group. The accounts will be automatically ungrouped and may be moved to another group.