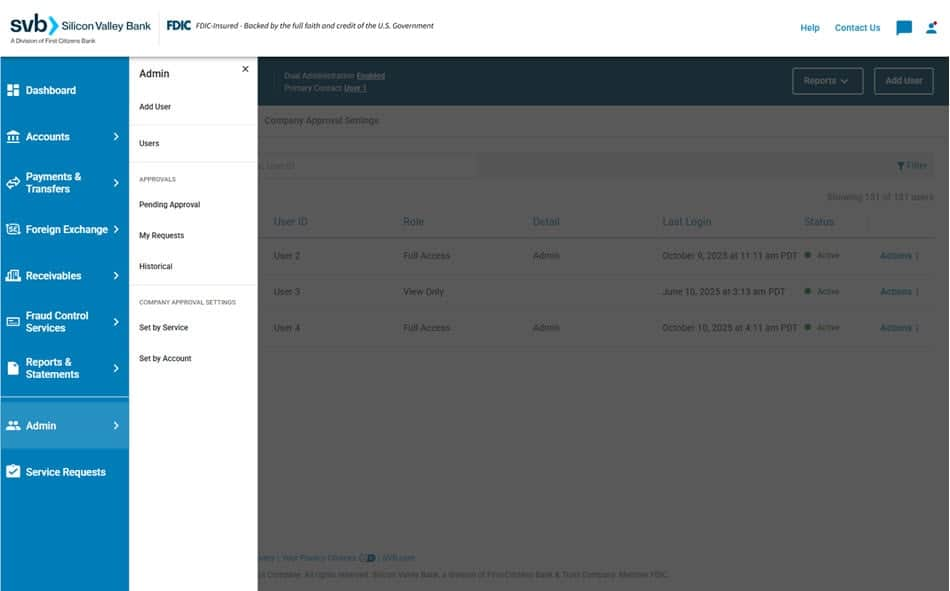
Administration
SVB Go Administration provides Full Access and Custom Users who have Admin Access with the ability to create and manage users for your company. From this page users can easily be added, edited, or deleted.
User Roles
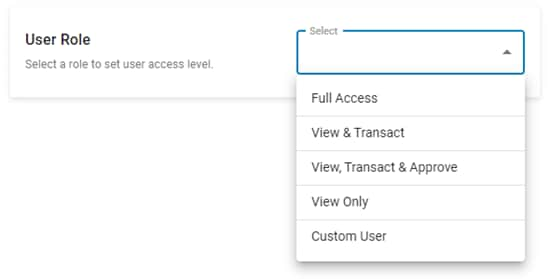
There are 6 different Role types available within SVB Go; 5 User Roles and Custom User.
The User Roles are Cardholder*, View Only, View & Transact, View, Transact & Approve and Full Access. With User Roles, each user added under a client inherits access to all services, permissions, and accounts belonging to that client based on the level of access assigned to the specific role. User Roles will automatically inherit new services or accounts that the client adds on in the future, based on their existing permissions.
*Cardholders must register their card to gain access. For more information, visit Card Program - Register/Activate Card.
For more information on each User Role, view the matrix below:
| Entitlements | User Access Roles | ||||
|---|---|---|---|---|---|
| Cardholder | View Only | View & Transact | View, Transact & Approve | Full Access | |
Accounts |
|||||
| View Account Reporting | |||||
| Full visibility to all Accounts, Loans and Card Programs | |||||
| Full access to all Accounts, Loans and Card Programs | |||||
| Target Balance Management | |||||
If the client has any SVB Asset Management (SAM) accounts, this user role will have the following permissions: |
|||||
| View SAM Accounts | |||||
| Make and Manage SAM Wires (including Templates and Imports) and SAM Internal Transfers | |||||
| Cardholder | View Only | View & Transact | View, Transact & Approve | Full Access | |
Loans |
|||||
| View Loans | |||||
| View Loan Statements | |||||
| Make a Loan Payment | |||||
| Request Advances | |||||
If the client has any Working Capital Loans, this user role will have the following permissions: |
|||||
| Access Only | |||||
| Access with Lending | |||||
| Cardholder | View Only | View & Transact | View, Transact & Approve | Full Access | |
Card Program |
|||||
| Self-Register, View and Manage their own SVB card. | |||||
| View Card Programs and Rewards Balances | |||||
| Report Card Lost/Stolen and Fraudulent Activity | |||||
| Order New Card | |||||
| Digitally View Card Details/Numbers for all Cardholders | |||||
| Make a Card Payment 1 | |||||
| Redeem Rewards | |||||
| Order Replacement Card | |||||
| Manage Card Statuses/ Spend Limits | |||||
If Card Approvals have been set up by the client, this user role will have approval authority for: |
|||||
| New Card Requests | |||||
| Updates to Card Spend Limits | |||||
| Cardholder | View Only | View & Transact | View, Transact & Approve | Full Access | |
Payments & Transfers |
|||||
| View Payment, Transfer, Map, Recipient, and Template Details | |||||
| Submit/Manage all Payment and Transfer types | |||||
| Import Payments and Templates | |||||
| Create and Modify Maps | |||||
| Create and Manage Recipients | |||||
| Create and Manage Payment Templates | |||||
| Approve/Reject all Payment and Transfer types, including Payment Templates. (see Admin for more Payment and Transfer Approval details by role) |
|||||
If the client is enrolled in ACH services (ACH Originations), this user role will have the following permissions: |
|||||
| ACH User Permissions | |||||
| ACH Approval Permissions 2 | |||||
| ACH System Administration | |||||
If the client is enrolled in Bill Pay Plus, this user role will have the following permissions: |
|||||
| View Only Permissions | |||||
| Administrator Permissions | |||||
If client is enrolled in Transact Gateway, this user role will have the following permissions: 3 |
|||||
| Client User | |||||
| Client Approver | |||||
| Client Admin | |||||
| Cardholder | View Only | View & Transact | View, Transact & Approve | Full Access | |
Foreign Exchange |
|||||
| View Trade Activity | |||||
| Book and Manage FX Trades | |||||
| Cardholder | View Only | View & Transact | View, Transact & Approve | Full Access | |
Receivables |
|||||
| Mobile Deposit | |||||
If client is enrolled in Lockbox, this user role will have the following permissions: |
|||||
| Lockbox User | |||||
| Lockbox Security Admin | |||||
If client is enrolled in Remote Deposit Capture, this user role will have the following permissions: |
|||||
| RDC User | |||||
| RDC Administration | |||||
| Cardholder | View Only | View & Transact | View, Transact & Approve | Full Access | |
Fraud Control Services |
|||||
If client is enrolled in Controlled Disbursements, this user role will have the following permissions: |
|||||
| User | |||||
| Security Admin | |||||
If the client is enrolled in Positive Pay (Fraud Control Services), this user role will have the following permissions: 4 |
|||||
| View Positive Pay ACH Debits, ACH Credits and Check Debits |
|||||
| Manage Positive Pay ACH Debits, ACH Credits and Check Debits |
|||||
| Approve Positive Pay ACH Debits, ACH Credits and Check Debits |
|||||
| - | |||||
| View Stop Payments and Deposits | |||||
| Submit and Manage Stop Payments | |||||
| Cardholder | View Only | View & Transact | View, Transact & Approve | Full Access | |
Administration |
|||||
| Eligible to be a Primary Contact | |||||
| View Company Approval Settings | |||||
| Eligible Approver for Dual Administration | |||||
If Payment Approvals have been set up by the client, this user role will have approval authority for: |
|||||
| Canceling payments and transfers pending approval initiated by themselves | |||||
| All payment and transfer types, including payment template approval/rejection for your company | |||||
If Sequenced Approvals have been requested by the client, this user role will have approval authority as: |
|||||
| First and Final Approver 5 | |||||
|
- |
|||||
| Create New Users | |||||
| Modify/ Delete Users | |||||
| Manage Payment, Transfer, and Approval Limits for all users | |||||
| Permission and Audit Reports to view all user access and activities | |||||
Default User Roles under a Multi-Entity client will have access to all legal entities linked to their company's profile. |
|||||
| View all legal entities enrolled under the Company's profile | |||||
| Transact under all legal entities enrolled under the Company's profile | |||||
| Manage all legal entities enrolled under the Company's profile | |||||
| Cardholder | View Only | View & Transact | View, Transact & Approve | Full Access | |
Service Requests |
|||||
| Subject to Enhanced Sanctions Screening | |||||
| Manage Drawdown Requests | |||||
| Generate Incoming Wire Instructions | |||||
| Request Account Verification | |||||
| Upload a Document 6 | |||||
| Cardholder | View Only | View & Transact | View, Transact & Approve | Full Access | |
Integrations |
|||||
| Integrate with third-party apps via Direct Connect (OFX) | |||||
| Add/Delete External Bank Accounts | |||||
1 Cardholders of companies enrolled in Individual Billing have the ability to make card payments as well. Full Access, View & Transact, and Custom Users with Make Card Payment entitlements can do so regardless of billing type.
2 Approval permissions will need be added by a System Administrator within ACH services.
3 If the SVB Go user role is updated, Transact Gateway permissions will not update automatically. For additional information on these permissions and how to make changes, please visit the User Administration section of Transact Gateway - User Roles.
4 Additional information on Positive Pay specific entitlements can be found under Fraud Control Services.
5 Full Access users and View, Transact & Approve users are defaulted as both First and Final Approvers for accounts that have Sequenced Approvals added. These designations can be changed without causing any other changes to the user role. Visit Modify/Delete Users to learn more.
6 Only Full Access users or Custom Users with Admin Access are able to Upload a Documents, however all users are able to view uploaded documents.
Primary Contact
Full Access users and Custom users with Admin Access can designate a Primary Contact as SVB's go-to person for day-to-day banking services and marketing communications.
- The assigned Primary Contact can be viewed on the Admin page.
- Once a Primary Contact is assigned, they cannot be deleted. To make those changes, you will first need to reassign the Primary Contact to another user.
- If Administrative Approvals are enabled, then an additional user with Admin Access will be required to approve updates to the Primary Contact.
The following information applies only to existing clients who have not yet assigned a Primary Contact.
- Two options are available for users who wish to have themselves assigned to this role:
- Have another user with Admin Access assign them.
- Contact your support team for assistance if there are no other users with Admin Access on the account.
Custom User
With User Roles, each user added under a client inherits access to all services, permissions and accounts belonging to that client based on the level of access that comes with each specific role. Clients that wish to designate specific user entitlements can do so by creating a Custom User. This provides the ability to pick and choose the services, permissions and accounts that the user will have access to.
Custom Users can be setup to automatically inherit access to new accounts setup in the future, for their existing Services and Permissions. This option can be toggled on during the user setup or modification, on the User Accounts screen.
Add a Custom User - Workflow
Step 1: User Information
Start by entering in the user's information. You will need their First and Last Name, Email Address, and Phone Number.
In the Role dropdown, select Custom User.
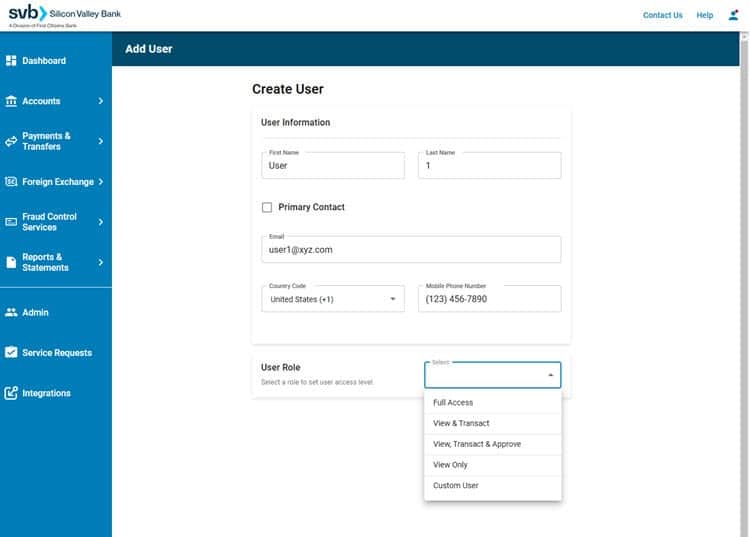
Upon selecting Custom User in the User Role dropdown, additional options to enable the user with Admin Access and/or Services will appear.
Please note: If you wish to give a user Admin Access, additional steps will be required.
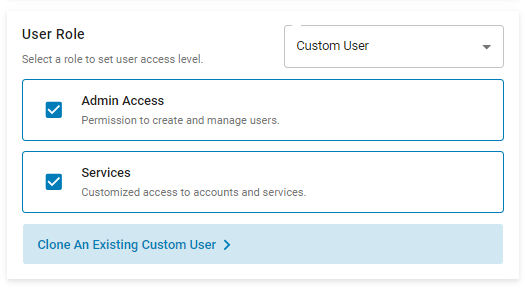
Additionally, users can easily create a new Custom User by selecting to Clone an Existing Custom User.

With this option, you can choose an existing Custom User with the Services, Permissions, and Access that you wish to duplicate. You will have the ability to edit these settings on the following screens.
Conditional Step: Customize Admin Access
If Custom Users with Admin Access is selected, they can be granted either Admin or Limited Admin access.
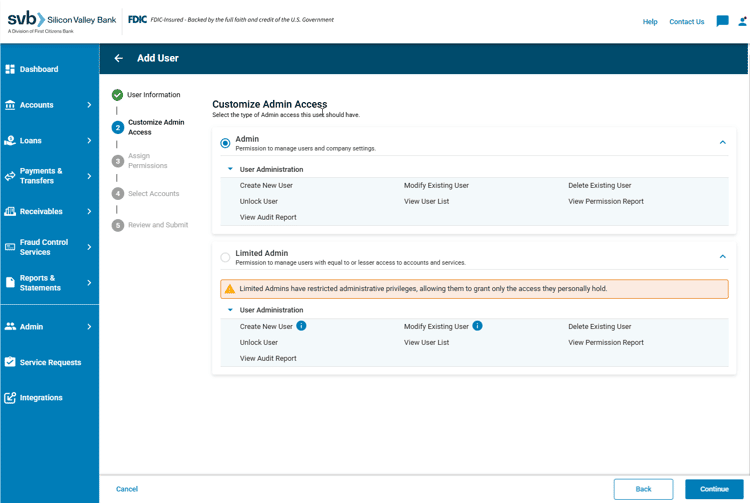
Select the option that applies and click Continue.
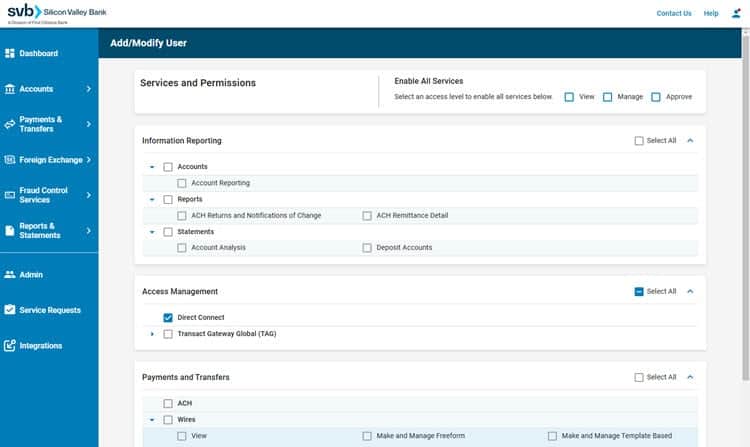
Step 2: Services and Permissions
In this step you will need to specify the entitlements you wish to grant this Custom User by selecting the box(es) that apply.
You can enable the user for services by giving them View, Manage, or Approve access, or you can pick and choose specific Services and Permissions.
Please Note: Approval entitlements will only appear as an option for users if the company has approvals for that specific service (ex. Card Program) enabled.
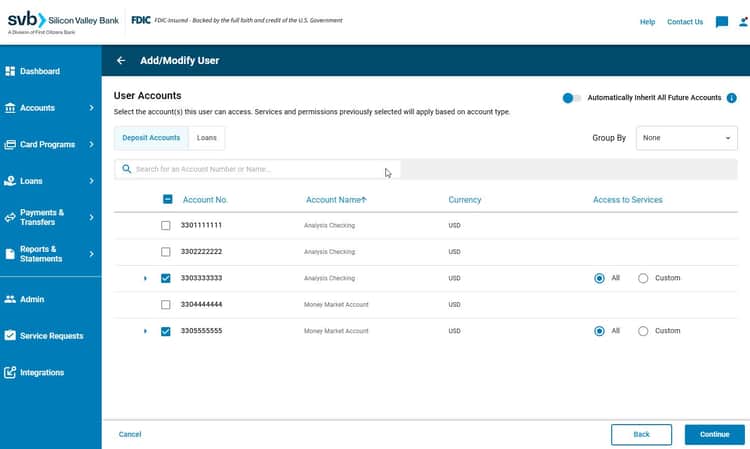
Step 3: User Accounts
This next step will have you designate the account(s) that the user can access. Custom Users will need to have each of the previously selected Services and Permissions applied to at least one account. Optionally, select the toggle at the top to have user Automatically Inherit All Future Accounts.
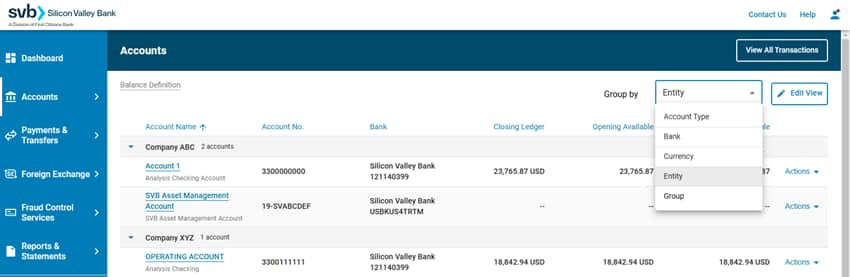
If a user is under a Multi-Entity client, you will have the option to group available accounts by Account Type or Entity. From there, select the accounts you want the user to be able to access. Learn more about Multi-Entity here.
In the Access to Services column:
- If All is selected, then all of the eligible Services and Permissions chosen in the previous step will be applied to this account.
- If Custom is selected, you can pick and choose the eligible Services and Permissions you want applied to the specific account.
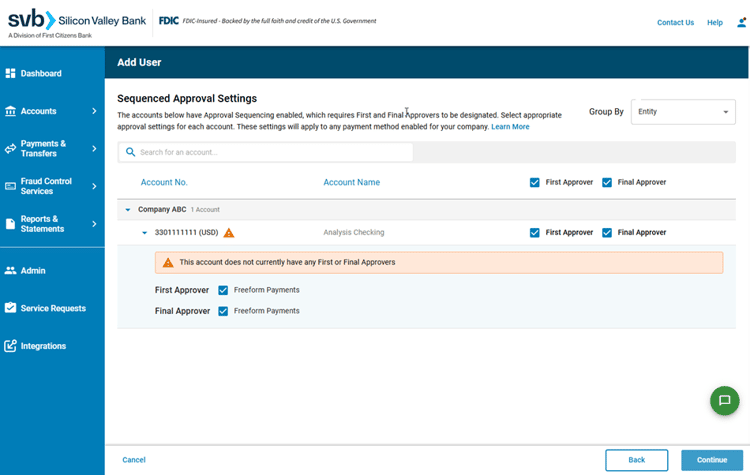
Conditional Step: Sequenced Approval Settings
If the company has Sequenced Approvals set up for an account, and the user has been granted Approval permissions along with access to that account, then an additional screen titled Sequenced Approval Settings will appear in the Add a Custom User workflow. Here you can designate the user as a First and/or Final Approver at the account level.
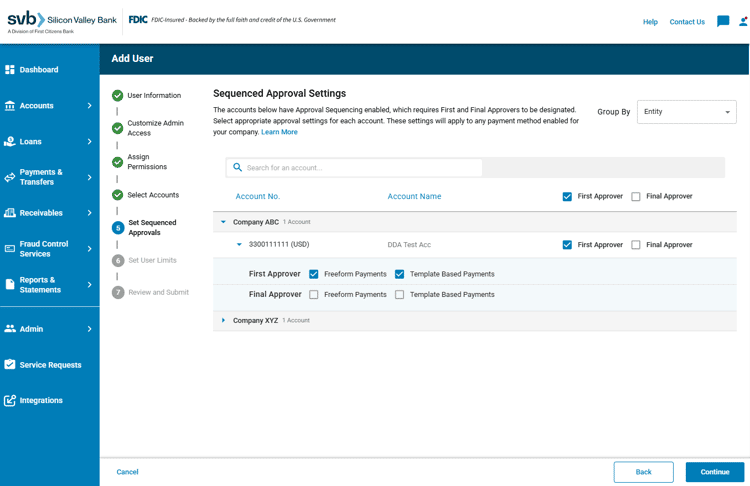
Learn more about Sequenced Approval Settings here.
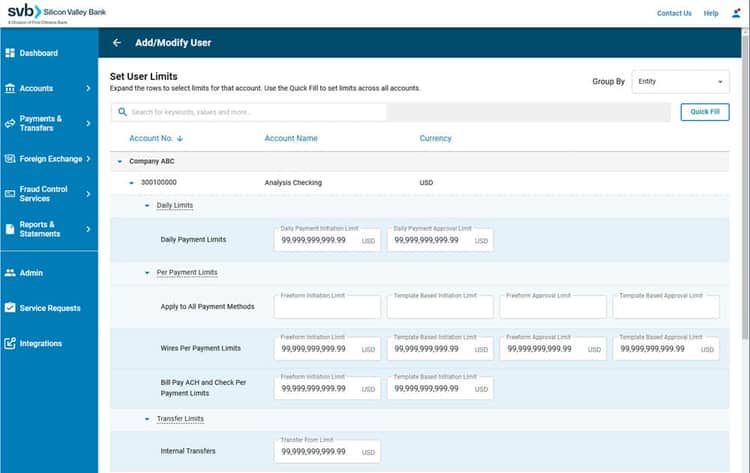
Step 4: User Limits
User Limits can be set during the Add User workflow, or at anytime afterwards by selecting Manage Limits when making modifications to an existing user.
All accounts that the user has been granted access to will appear on the User Limits screen. Specify the limits you wish to apply for each account.
Conditional Step: Manage Card Programs
If the company is enrolled in Multiple Card Programs, users will see an additional screen titled Manage Card Programs in the Add a Custom User workflow. Here you can select the specific Services & Permissions that you wish the user to have as they pertain to each of the available Card Programs.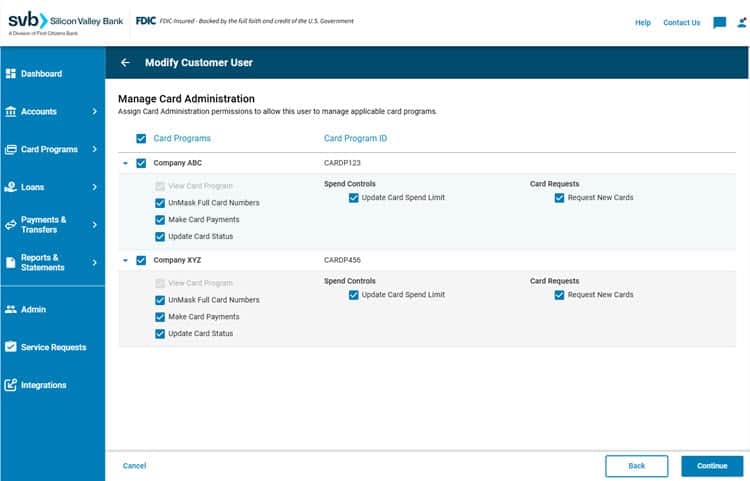
If there is only one Card Program under the client then this screen will not appear and all Services and Permissions for the Card Program will be designated in Step 2: Services & Permissions of the Custom User setup.
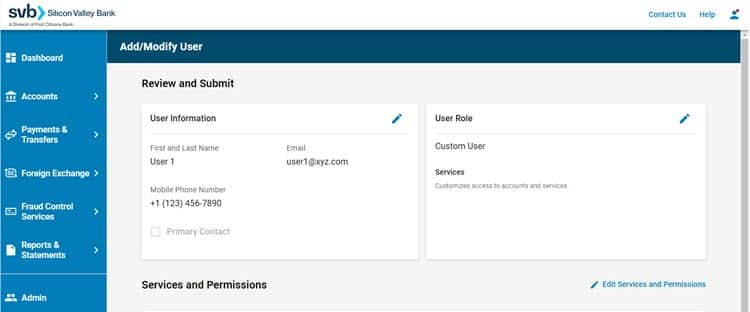
Step 5: Review and Submit
In the final step, review all of the information associated with your Custom User. Select the pencil icon in each section to make changes.
If everything looks correct, click the Submit button at the bottom of the page to save the user.

Please note: While Administrative permissions can be granted to a Custom User during the Add User workflow, clients enrolled in ACH services, that wish to create a Custom User with Admin Access only, will need to take additional steps in the ACH platform to manage those specific User Entitlements. 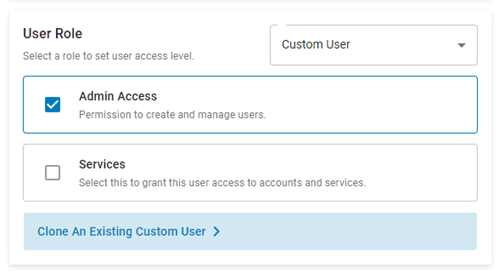
Custom Users with Admin Access will need to have one of the following selected.
- Admin: Permission to manage users and company settings.
- Limited Admin: Permission to manage users with equal to or lesser access to accounts and services.
Approvals
User Administration Approvals
Users with Admin Access can easily view the Dual Administration status of their company at the top of the Administration page.
If Dual Administration is enabled for your company, a request to update can be approved or rejected by selecting the pending user on the Administration page. This will take the approver to either the Permissions page, to Add or Modify a User, or the User Details page, where all other administrative requests can be approved under Pending Approvals.
Users with Admin Access can also View Details and decision all available pending updates from the Approvals tab on the Administration page. From here users will see the following subtabs:
- Pending Approvals: User updates pending approval.
- My Requests: Requests initiated by the user, still awaiting approval.
- Historical: Shows all items which have been decisioned or modified in the last 7 days.
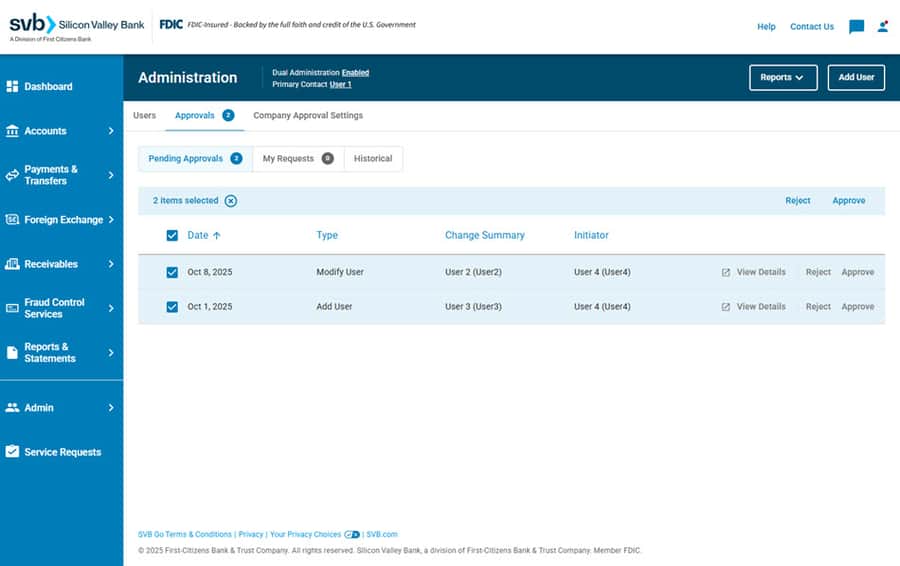
If enabled, a second user with Admin Access will be required to approve the following administrative actions:
Users with administrative actions that have been initiated, will see their status reflected as 'Pending' until that change is approved or denied.
To set up or modify user administration approvals for your company, please contact your support team.
Payment and Transfer Approvals
Users with Approval permissions can do so from the Payments & Transfers - Pending Approval tab.
The Pending Approval payment list can be searched or filtered by type, account, amount, date, etc. Users with Approval permissions can Approve or Reject payments directly from the listed results.
Up to 60 Cross-currency and Same-currency transactions can be approved or rejected at one time as a bulk approval. The same user cannot approve/reject a payment that they initiated.
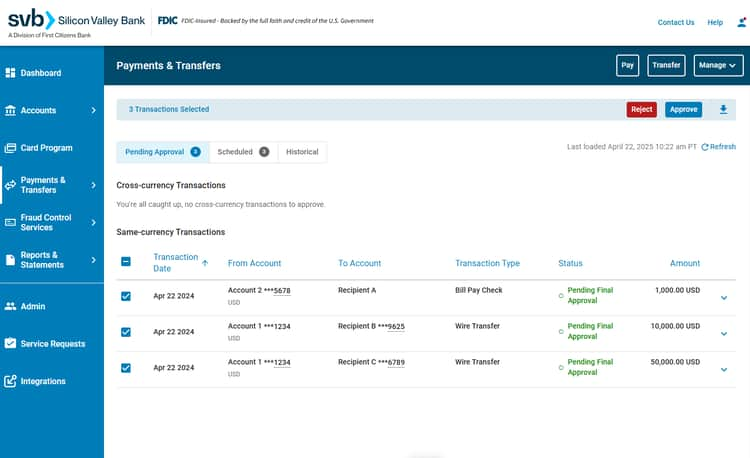
Please note: Inline FX Wire Transfers are ineligible for bulk approvals since they first require a rate to be confirmed.
If only Inline FX Wire Transfers are selected, users will see a grayed-out Approve box at the top of the page.
If other transaction types are also selected, a warning that the Inline FX Wire Transfers cannot be included will appear and those transactions will be removed from the selected approval list.
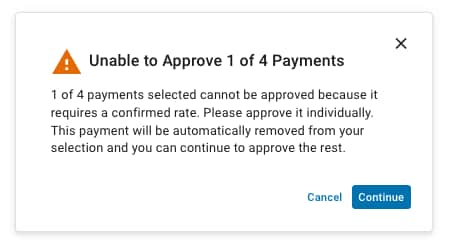
To learn more visit Inline FX Wire Transfers.
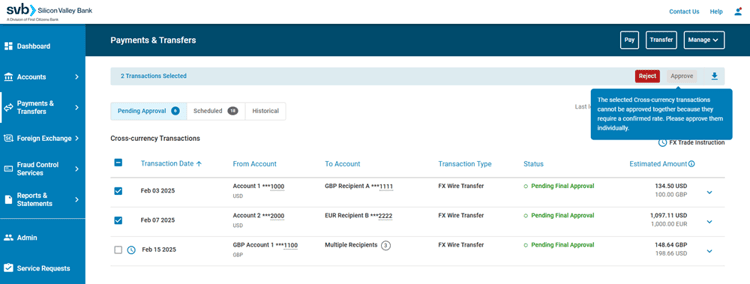
If a Deal-based FX Transaction that is pending approval is Rejected, this does not mean that the FX deal is rejected. FX Trades that are still active will be given a Confirm Rejection prompt to acknowledge that the FX Trade remains active, existing payment instructions will be removed and new ones will need to be provided.
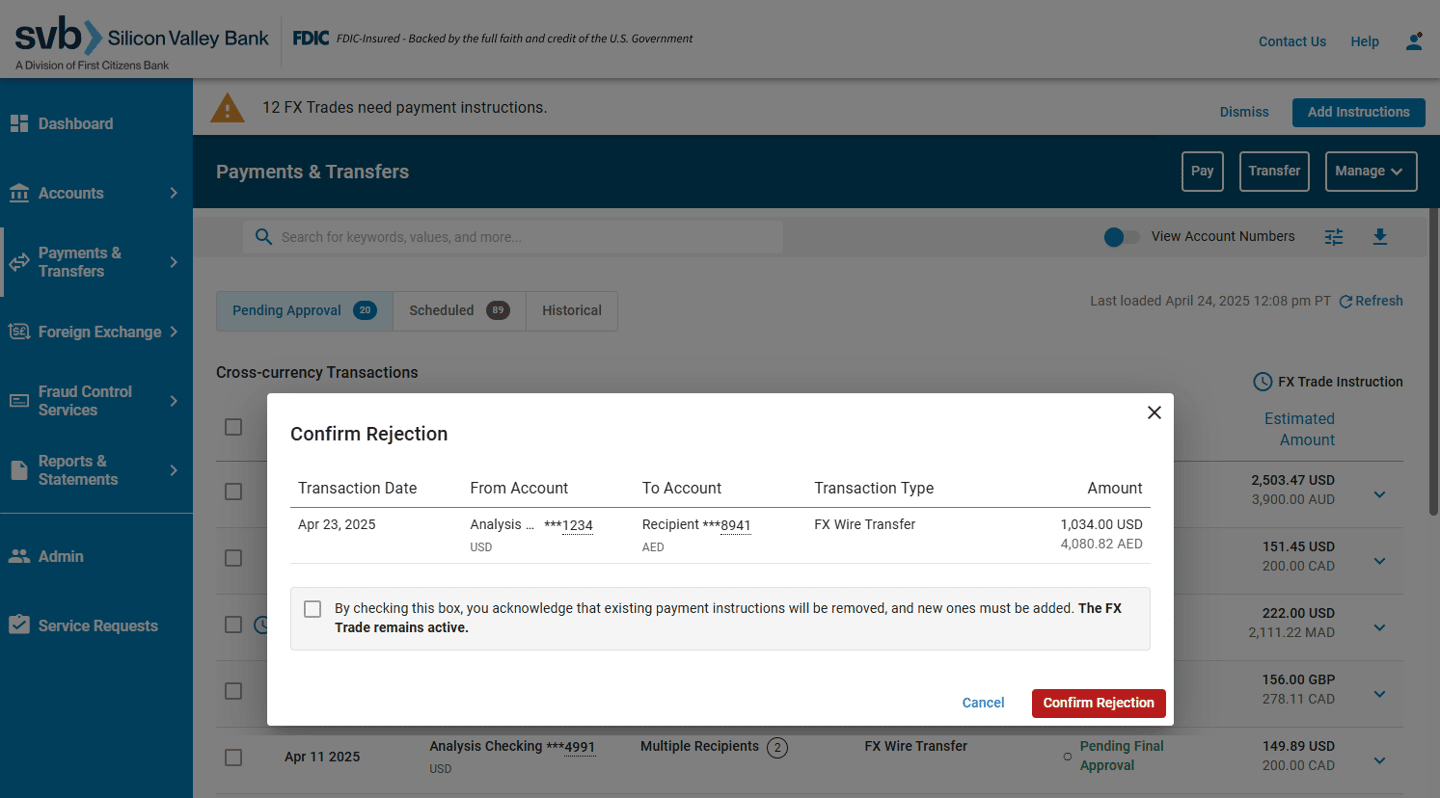
To learn more, visit Deal-based FX Wire Transfers.
Fixed vs Variable Approvals
Your company's payment approvals can be set up either on a Fixed or Variable basis:
- Fixed: Allows company to require either 0, 1, or 2 approvers for all payment transactions, regardless of dollar amount.
- Variable: Allows company to set dollar thresholds for when 0, 1, or 2 approvers will be required for payment transactions.
- ex. 0 approvals required for payments up to $50k, 1 approval required for payments between $50k and $1MM, and 2 approvals required for payments over $1MM
Variable Approvals by Service
Variable approval levels can also be designated for each specific payment service, allowing clients better control over outgoing payments from their SVB accounts. See the following example:
- Freeform Wires: 0 approvals required for transactions up to $10k; 1 approval required for transactions over $10k
- Template Based Wires: 0 approvals required
- Single Check and ACH: 1 approval required for transactions up to $50k; 2 approvals required for all transactions over $50k
- Global ACH: 0 approvals required for transactions up to $25k; 2 approvals required for all transactions over $25k
- Instant Payment: 0 approvals required for transactions up to $15k; 1 approval required for transactions over $15k; 2 approvals required for transactions over $25k
ex. A user with approval limits up to $10k USD, would be able to approve an FX payment equal to or less than $7.8k GBP given an exchange rate of .78.
Variable Approvals by Account
Additionally, variable approvals can be set up per account. This allows users to select the number of approvals and if desired, indicate the transaction amount required to trigger each approval level (0, 1 or 2 approvers) for Freeform Instant Payments and Wires and Template Based Instant Payments and Wires within specific accounts. See the following example:
- Account XXXXXX1234:
- 0 approvals required for Freeform Wires below $10k; 1 approval required for Freeform Wires over $10k
- 0 approvals required for Template Based Wires
- Account XXXXXX5678:
- 1 approval required for Freeform Instant Payments up to $50k; 2 approvals required for Freeform Instant Payments over $50k
- 0 approvals required for Template Based Instant Payments up to $25k; 1 approval required for Template Based Instant Payments over $25k; 2 approvals required for Template Based Instant Payments over $50k
- Account XXXXXX9000:
- 0 approvals required for Freeform Wires up to $25k; 2 approvals required for Freeform Wires over $25k
- 0 approvals required for Template Based Wires up to $25k; 2 approvals required for Template Based Wires over $25k
* Freeform and Templated Payments (Instant Payments and Wires) are currently the only payment types eligible to set up variable approvals per account.
To set up or modify payment approvals for your company, please contact your support team.
Clients can request to set up or modify the number or type of payment approvals required before funds are sent to a recipient. Admins have the ability to designate if payments will require One, Two or Sequenced Approvals based on payment type, account and dollar amount levels.
SVB recommends designating at least one approver for payment transactions.
Sequenced Approval Settings
Sequenced Approvals allow clients to designate a line of command for who is entitled to approve a payment and in what order. Clients have the ability, at the account level, to establish chronologically designated First and Final Approvers to review and release payments to the bank.
- First Approver: In accounts that have enabled Sequenced Approvals, this designation allows the approver to perform an initial review of the transaction prior to being sent for final approval.
- Final Approver: In accounts that have enabled Sequenced Approvals, this designation allows the approver to complete the final review and release to the bank for payment.
Existing Full Access and View, Transact & Approve users will default to having both First and Final Approver designations.
Existing Custom Users with Approval permissions will default to having First Approver designations only.
These defaulted approval settings can be changed at any time. Visit Modify/Delete User to learn more.
Please note: At least one approver must have an approval limit greater than or equal to the payment amount, in order for the payment to be released.
Sequenced Approvals can only be designated for payment services with approvals set at the account level. For more detailed information please review the Payment Approval Rules matrix .
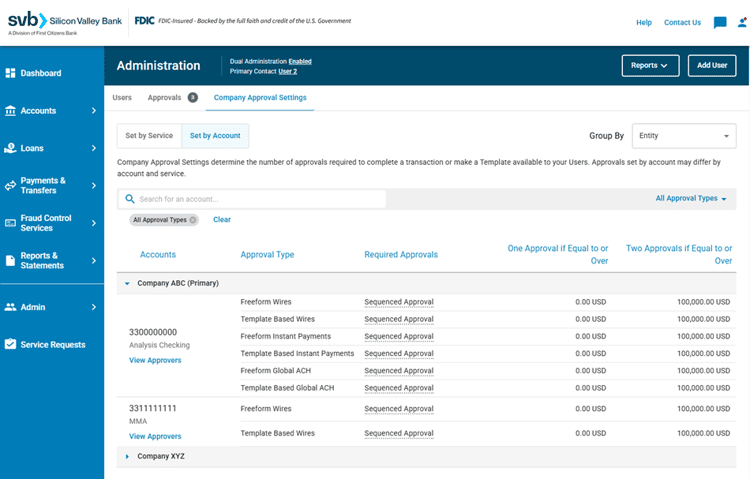
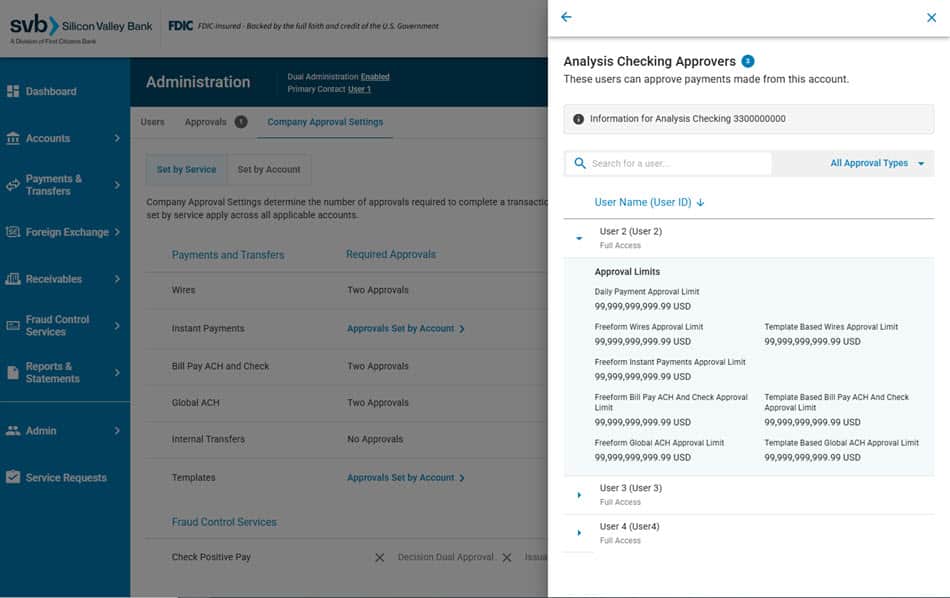
To view existing payment/template approval requirements select the Admin tab in the left-hand navigation. From there select the Company Approval Settings tab at the top of the page.
Company Approval Settings determine the number of approvals required to complete a transaction or make a Template available to your Users. Approvals set by account may differ by account and service.
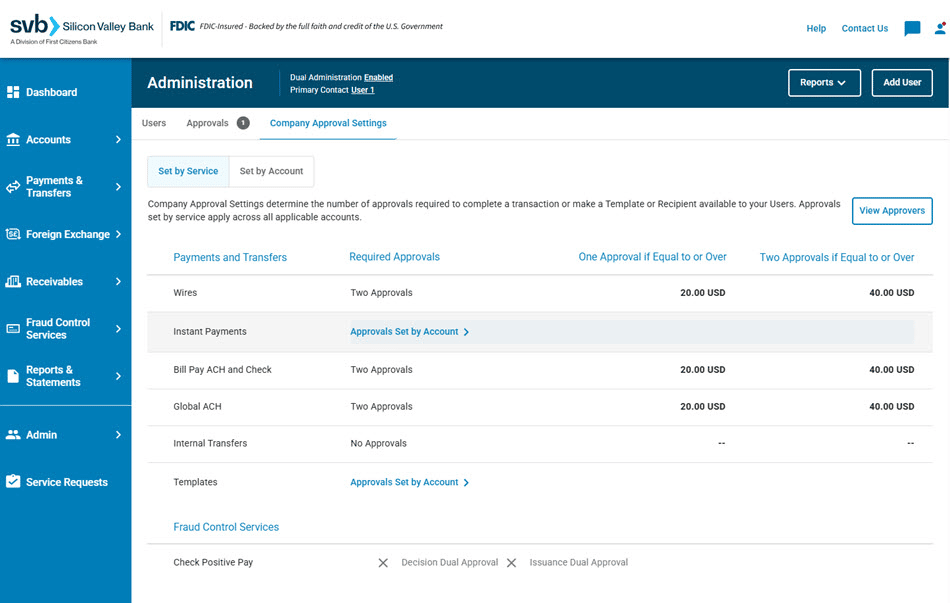
Additionally, an Admin can view the details of each approver listed by selecting View Approvers on either the Set by Service or Set by Account tabs, there they can view all approvers and see the limit details of each.
Please note: If the company is setup with Sequenced Approvals the list details will also include First Approver and/or Final Approver designations.
To set up or modify payment approvals for your company, please contact your support team.
| Number of Payment Approvals Required | Payment Approval Rules |
|---|---|
| No Approvals | To Initiate Payment: Any View & Transact user, View, Transact & Approve user, Full Access user or Custom User with payment permissions for that service can initiate payments within their user limits. To Approve Payment: No Payment Approvals required. |
| One Approval | To Initiate Payment: Any View & Transact user, View, Transact & Approve user, Full Access user or Custom User with payment permissions for that service can initiate payments within their user limits. To Approve Payment: Any ONE Full Access user, View, Transact & Approve user or Custom User designated as an Approver for this type of transaction is needed. This user must have an approval limit for that service that is greater than or equal to the payment amount. Approval of the payment amount, along with any other approvals made for that day, must fall within the user's Daily Payment Approval Limit. |
| Two Approvals | To Initiate Payment: Any View & Transact user, View, Transact & Approve user, Full Access user or Custom User with payment permissions for that service can initiate payments within their user limits. To Approve Payment: Any TWO Full Access users, View, Transact & Approve users or Custom Users designated as an Approver for this type of transaction is needed. These users must have an approval limit for that service that is greater than or equal to the payment amount. Approval of the payment amount, along with any other approvals made for that day, must fall within each user's Daily Payment Approval Limit. |
| Sequenced Approvals | To Initiate Payment: Any View & Transact user, View, Transact & Approve user, Full Access user or Custom User with payment permissions for that service can initiate payments within their user limits. To Approve Payment: One Full Access user, View, Transact & Approve user or Custom User designated as a First Approver with access to this account for this type of transaction is needed. AND One Full Access user, View, Transact & Approve user or Custom User designated as a Final Approver within the account for this type of transaction is needed. At least one approver must have an approval limit greater than the payment amount, in order for the payment to be released. Approval of the payment amount, along with any other approvals made for that day, must fall within each user's Daily Payment Approval Limit. |
Please note: Upon establishing Payment Approval Settings, admin will need to ensure that enough users with the necessary User Roles and the appropriate Approval designations exist in order to successfully approve a payment.
For assistance modifying users to meet these requirements, visit Admin - Modify/Delete Users.
Template Approvals
Clients can request to set up or modify the number of template approvals required before a template is active and can be used to initiate a payment. The same user cannot approve/reject a template that they created.
If Template Approvals are enabled for your company, then the approval settings are applicable to all accounts and can be set up only on a Fixed basis:
- Fixed: Allows company to require either 0, 1, or 2 approvers before a template is active and can be used to initiate a payment.
To set up or modify template approvals for your company, please contact your support team.
Card Approvals
Clients can request to set up or modify required Card Approvals before a spend limit can be updated or a new card can be issued.
If Card Approvals are enabled, then the approval settings are applicable to the entire card program. The same user cannot approve/reject a spend limit or new card request that they created.
To set up or modify card approvals for your company, please contact your support team.
User Limits
User Limits can be set during the Add User workflow, or at any time afterwards by selecting Manage Limits when making modifications to an existing user.
All accounts that the user has been granted access to will appear on the User Limits screen. Specify the limits you wish to apply for each account.
ex. A user with approval limits up to $10k USD, would be able to approve an FX payment equal to or less than $7.8k GBP given an exchange rate of .78.
Payment Limits
Initiation Limits
- Daily Payment Initiation Limit: Indicates the maximum cumulative payment amount that a user can initiate for a specific payment date. This limit is determined by the payment date, not the date the payment is initiated on.
- Per Payment Freeform Initiation Limit: Indicates the maximum amount that may be initiated in a single Freeform payment.
- Per Payment Template Based Initiation Limit: Indicates the maximum amount that may be initiated in a single Template Based payment.
Approval Limits
- Daily Payment Approval Limit: Indicates the maximum cumulative payment amount that a user can approve for a specific payment date. This limit is determined by the payment date, not the date the payment is approved.
- Per Payment Freeform Approval Limit: Indicates the maximum amount that a user may approve for a single Freeform payment.
- Per Payment Template Based Approval Limit: Indicates the maximum amount that a user may approve for a single Template Based payment.
Please note: Approval Limits will only apply if the company has turned on Payment Approvals, and will only show up for the user if they have been granted Approver entitlements.
Your Per Payment Initiation/Approval Limits must be less than or equal to your Daily Payment Initiation/Approval Limits.
Transfer Limits
The Transfer From limit indicates the maximum amount that may be transferred in a single transaction between SVB accounts.
Please note: Transfer Limits will only show up if the user has access to another SVB account under the client.
Quick Fill Limits
Save time and steps by applying limits to one or all accounts for this user. Quick Fill is a tool within SVB Go that can be used to establish a baseline for each type of limit. This baseline will be applied across all accounts.
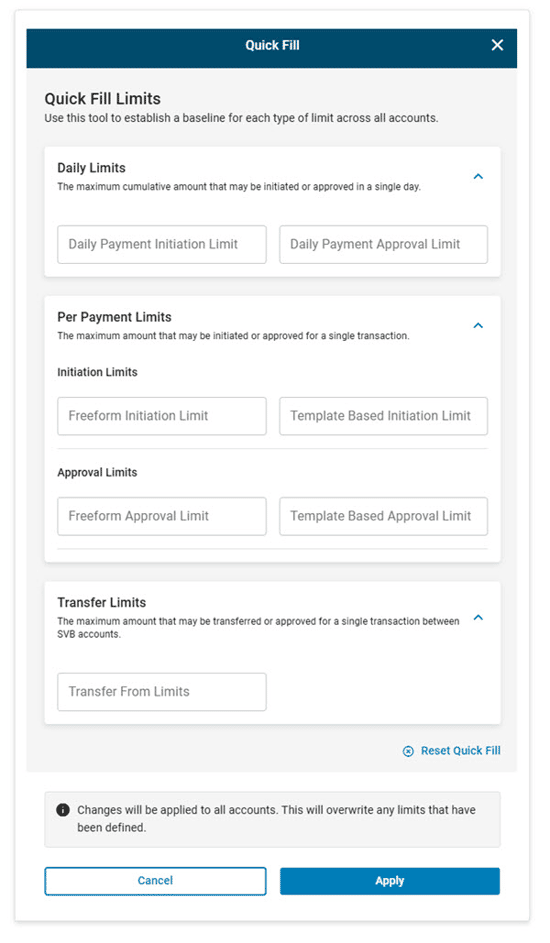
For new SVB Go clients:
- The first Full Access user will have limits set to the maximum by default.
- Any subsequent users will need to have limits set to a specific value (up to the maximum) when that user is created.
For existing SVB Go clients who open a new account:
- Full Access users will have their limits set to the maximum by default.
- View & Transact and View, Transact & Approve users will have limits defaulted to 0.
- Any subsequent users added will need to have limits set to a specific value (up to the maximum) when that user is created.
- This relates only to accounts eligible for pay and transfer services.
User Limits can be modified at any time by a user with Admin Access. Users cannot edit their own limits.
Modify/ Delete Users
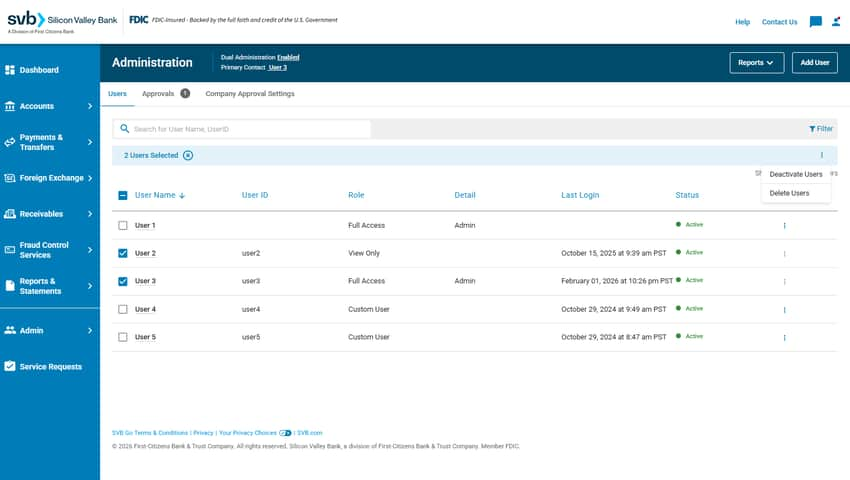
Users with Admin Access have the ability to modify or delete single or multiple users from the Users tab in the Admin page.
To modify multiple users, click the check box to the left of the user's names on the list. Once all users are selected click the three dots to the right of the blue Users Selected bar. Choose one of the available options listed, and a popup screen will show the user's names, and confirmation of the action requested. Click the button to confirm the request.
Admins are able to complete the following actions:
- Resend Welcome Email
- Deactivate User
- Activate User
- Delete User
Please note: Only actions shared with all users will be listed as available options for modification. If Dual Administration is enabled for your company, a second user with Admin Access will be required to approve the Delete Users action.
To modify a single user you must first access their User Details page. This can be accessed on the Admin screen by clicking anywhere in the row of the user you wish to modify/delete.
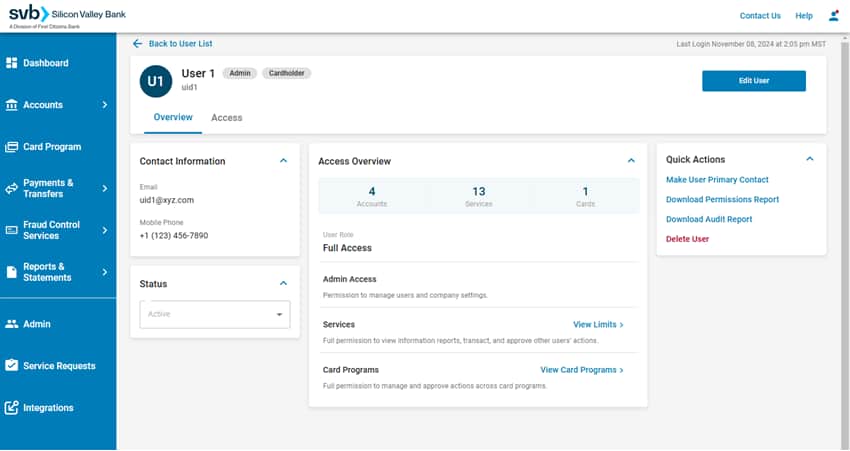
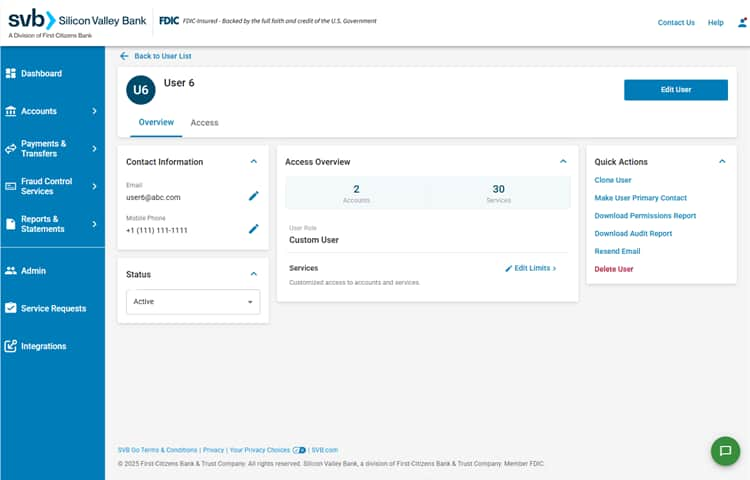
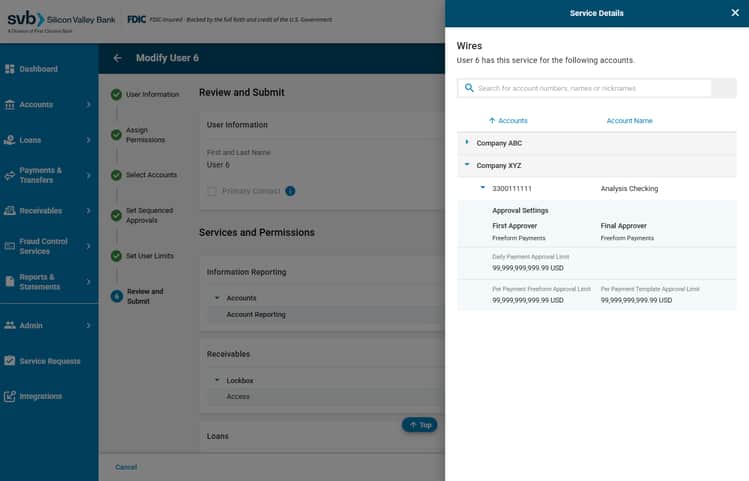
From the User Details page you can:
- View the user's Last Login date in the top right-hand corner.
- View the user's Status and update to Active or Inactive.
- Assign the user as the Primary Contact, Clone User 1, Download Permission and Audit Reports or select to Delete User 2 in the Quick Actions section on the right-hand side of the page.
- View the Accounts and Services that the user has access to in the Access Overview section.
- Make changes to the user from the blue Edit User button at the top of the page. Here users can edit Contact Information 3, modify a User Role, and make updates to the user's4 Services, Permissions, Account Access, User Limits and Card Programs.
- Complete User Administration Approvals for user updates.5
- Select the Edit Limits link which takes users directly to the User Limits screen. Here you can select/change the users payment, transfer and approval limits if applicable.
1 This option will only appear for Custom Users and allows the specific user's entitlements to be duplicated. You will have the ability to edit these settings on the following screens.
2 When a user is deleted from the client's profile, all services, permissions, and account accesses granted will be removed.
3 For account security, users will only be able to edit either the email address or phone number at a given time.
4 Users with admin access can self-initiate modifications to your own user details for clients enrolled in Dual Administration.
5 Dual Administration must be enabled for your company, and a second user with Admin Access is required to approve those administrative actions.
Please Note: If a user has scheduled a payment, and has since then had their permissions modified so that they no longer are entitled to create that payment on the day of the scheduled transaction, the payment will be canceled.
All pending and future scheduled payments will be canceled if the initiator of that transaction is deleted.
Modify Sequenced Approval User Settings - Workflow
Sequenced Approvals allow clients to designate a hierarchy, or line of command of who is entitled to approve a payment and in what order.
On the Admin page of SVB Go, a user with Admin Access can designate which users will have authority as a First and/or Final Approver.
Learn more about Sequenced Approval Settings here.
Step 1: Access User Details
Select the user on the Admin screen, by clicking anywhere in the row of the user you wish to modify. On the user details page click the Edit User button in the top right-hand corner of the screen to be taken to the Modify User screen.
Step 2: Modify User
In the user role field verify user is a Full Access, View, Transact & Approve or Custom User*. Click Continue.
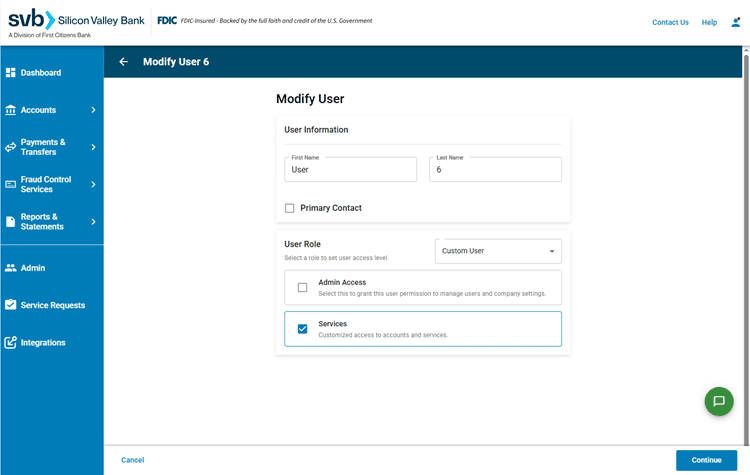
*If a Custom User, they must also have Wire Approval permissions designated on the Services & Permissions screen and access to the account setup for Sequenced Approvals on the User Accounts screen. Review the additional steps to modify settings for a Custom User.
Step 3: Sequenced Approval Settings
From this page select First Approver and/or Final Approver designations. This can be made for all accounts, for specific accounts and/or for Freeform and/or Template Based Payments.
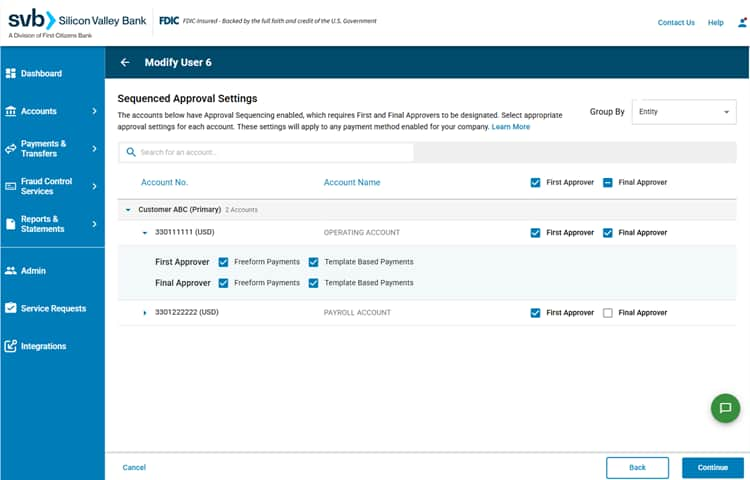
Please Note: If the account listed does not have First Approver, Final Approver or First and Final Approvers for the account being modified, a warning message will display under the account with information as to what approver is missing. Correcting this error ensures the company can process payments from the account.
Existing Full Access and View, Transact & Approve users will default to having both First and Final Approver designations.
Existing Custom Users with Approval permissions will default to having First Approver designations only.
Once all selections are made click Continue.
Step 4: Set User Limits
On the User Limits screen, users with Admin Access can set specific approval limits for the previously selected entities or accounts.
Once all selections are made click Continue.

Please note: All accounts regardless of Sequenced Approval setup will show on this page. Users can search for the entity or account number edited on the previous page.
If no limits are added, user will have limits set to the maximum by default. First Approver and Final Approver limits apply to all payment types setup with Sequenced Approval. Learn more about User Limits here.
Step 5: Review and Submit changes
In the Payments and Transfers section, click X Accounts to review approval settings and limits for each account.
Click Save to submit.
Reports

Audit Report
Audit Reports provide users with Admin Access an additional way to manage accounts and user activity. To generate an Audit Report, select the Reports button in the top left-hand corner of the Admin page in SVB Go. Select Audit Report from the dropdown.
From here, go through the workflow to select users, activities, events, and specify the timeframe and activity status for which to generate the Audit Report. Lastly choose your export preference.

Permission Reports
Permission Reports provide users with Admin Access an additional way to view a user's current permissions and entitlements.
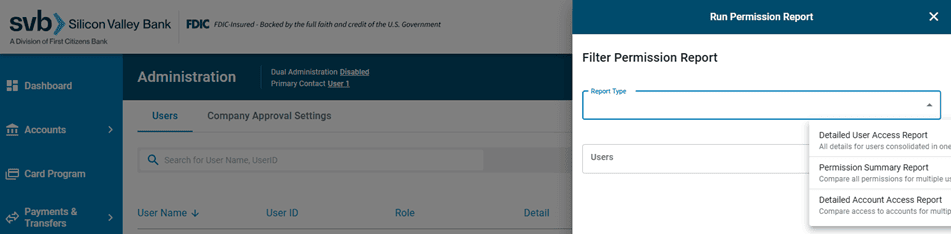
Detailed User Access Report
This report allows Admins to view and compare both user permissions and account access in one consolidated report. This report can be viewed On-screen or downloaded as a PDF & CSV.
Permission Summary Report
This report allows Admins to view and compare all permissions for multiple users. This report can only be downloaded as a CSV.
Detailed Account Access Report
This report allows Admins to view and compare accounts which users can access, for multiple users. This report can only be downloaded as a CSV.
To generate a Permission Report, select the Reports button in the top left-hand corner of the Admin page in SVB Go. Select Permission Report from the dropdown. There are three report types which can be selected.
This will pull out a side drawer where you can select the Report Type and the users to view in the selected report. Either click Download Report to directly download that information in PDF or CSV format,
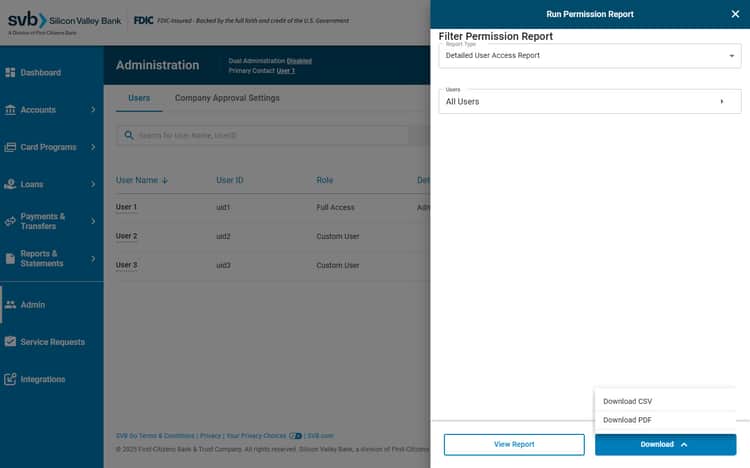
or click View Report to view Detailed User Access Report with-in the platform.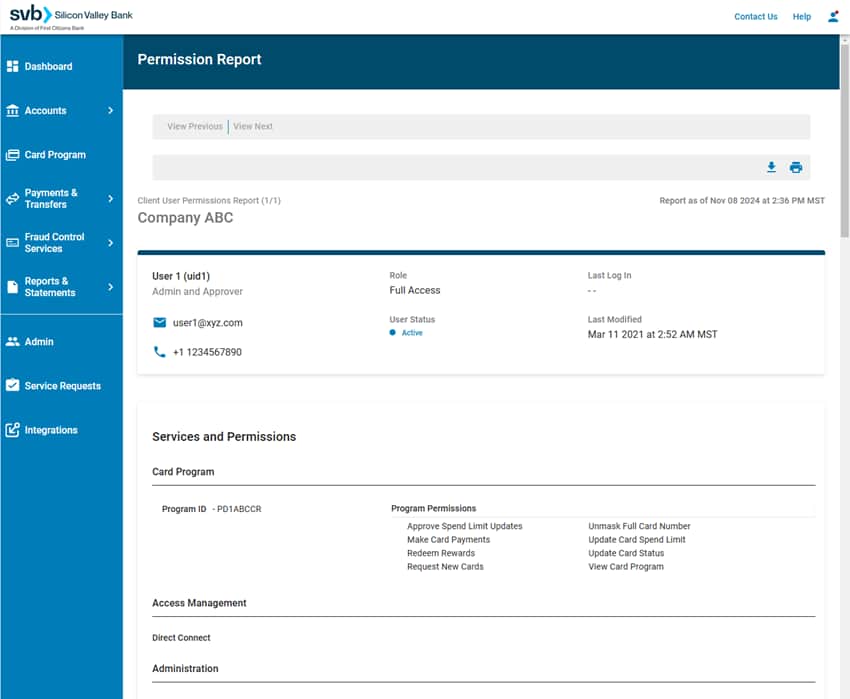
Multi-Entity
SVB Go allows clients who manage multiple legal entities to link them all to a primary profile, allowing you to view each entity under a single SVB Go login.
- All User Roles (Full Access, View & Transact, View, Transact & Approve and View Only) will have visibility to all legal entities linked to their company's profile.
- Custom Users can be entitled to specific accounts and permissions but they will not automatically have access to all legal entities.
Users under a Multi-Entity client have the ability to view and filter between entities on multiple screens including Accounts, Admin, and Payments & Transfers.